

Nail extensions, an integral part of nail art are means of self- expression and evokes unique feelings, behavior patterns, and provides an insight into the psychological profile of the person. They are taught in almost all nail artistry courses.
Make your wedding day a nostalgic and memorable occasion in your life with the exemplary form of nail art. Every detail matters on this day from dressing to hairstyling, the lehengas, the jewels, the eye brows and most importantly the nails.
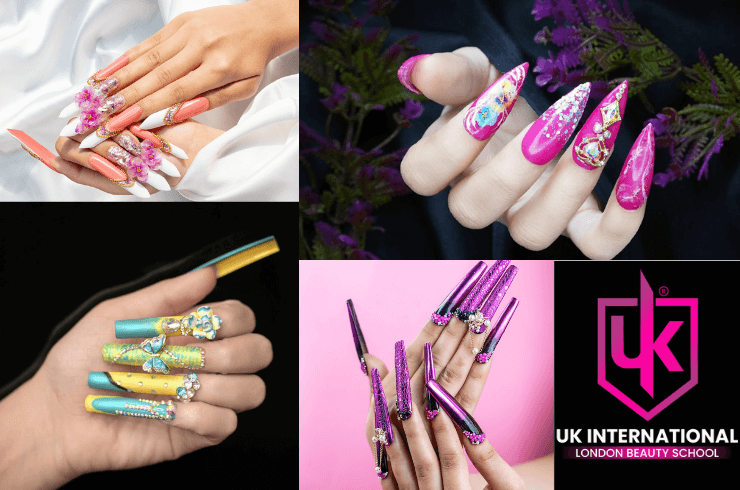
Nowadays all parties even demand you to dress differently and complementing it are the nail extensions. They add elegance, style and attitude to your looks. They sharpen your feminist approach. Below we have detailed the types, shapes, designs, application ways, colors and shades along with current trends to ensure perfect party or bridal manicure.
Understanding Bridal Nail Extensions
These are enhancements on nails done artificially. They are applied above natural nails to improve aesthetics, style, overall appeal of the makeup and more. Nail extensions have a variety of creative designs, shades and colors. They can last several weeks if care is taken properly.
These extensions provide a foundation base for classic, intricate nail arts including rhinestones, glitter, 3D designs and more. They are customized to match bridal and party dresses, match eyebrow shades or even the sandals and stilettoes being worn.
Types of Bridal Nail Extensions
Bridal Nail extensions are made of different types of materials which are explained in nail artistry courses
1. Acrylic Nail Extensions
These are made by blending liquid acrylic monomers with powdered acrylic monomers. They harden into a protective shell over your natural nails. They are durable, and can be worked on for different art forms on nails.
Certain features
- They last long for up to 3-4 weeks
- Provides a good base for 3D art and embellishments
- Require filing and shaping
- Need to be applied carefully for thin and uniform coating
2. Classic Gel Extensions
These nail extensions are popular owing to their high shine finish and natural appearance. These are photopolymerizable resins present in the form of gel. When exposed to UV or LED light they harden and form a glossy cover providing a natural look. They have less odor than acrylic extensions. They provide a smooth finish with great shine. As compared to acrylics they are less durable. They need to be cured under UV or LED light for hardening.
3. Polygel Extensions
Polygel nail enhancement is a hybrid system which blends acrylic property with gel nails. It is a semi polymerized acrylate with reduced odor and has a texture like putty. They are strong and lightweight. If applied wrong on the nails, they are easy to reshape and correct the mistakes contrary to other nail extensions. They require professional application and need curation under UV/LED light.
4. Silk or Fiberglass Extension
These nail extensions are pure silk fabric provided with cyanoacrylate-based resins or adhesive. This is softer on the nails than acrylics. They are translucent or transparent and have a natural appearance and are best suited for fragile or brittle nails. They can’t support 3D art or heavy decorations.
5. Dipping form nail extension
These nail extensions give strength and shape to the natural nails by combining a bonding liquid with a unique dipping powder. They are quicker to work with than acrylics, as they don’t require monomer liquid or UV light. The powder layers give a finish that feels natural and is both lightweight and long-lasting.
Also Learn- Everything About Nail Technician Course
Popular Nail Shapes for Bridal Nail Extensions
Nail shapes complement the personality of ladies and can be used for influencing attitude in parties and weddings. Nail shapes are an integral part of your entire bridal makeup.
Almond Nail Extensions- It smoothly tapers towards the tip resembling almond. They are apt for soft kitty parties and bridal looks. They are perfect for dates and romantic ventures.
Coffin/Ballerina Nail Extensions –They have tapered sides and squared off tips resembling ballerina’s slippers. They are best for celebrities and influencers who enjoy providing nail statements.
Oval Nail Extensions –They have gently tapered rounded tips and are best suited for brides who are fashion-forward and want to make bold statements during a bridal party.
- Stiletto Nail Extensions – These are stiletto shaped nails and have pointed tips. For nail art of these nail extensions, bulky decoration needs to be avoided at the tip
- Square or Squoval Nail Extensions – They have straight edges with slightly oval corners. It’s an office friendly nail art and fit for wide or narrow fingers.
The right bridal nail extension designs can improve your party, office and bridal look, and complement your overall dressing theme for the occasion.
Below we have provided various bridal nails design and color ideas
How to Apply Bridal Nail Extensions?
Step 1: Preparation of the Nail
At this stage, clean the nail with alcohol wipes. Just after wiping, soak the hand in soapy water, which cleans the skin and makes it soft. Start removing the dead skin around the edges of the nail with a cuticle nipper, then moisturise the skin.
Step 2: Choosing the nail tip
There are multiple nail extension tips; compare them and select the nail extension tip against natural nails. Select the nail extension types, such as coffin/ballerina, almonds, squirrel, or stiletto, as per the occasion needed.
Step 3: Nail Tip Application
- Use a dehydrator to eliminate moisture and oils.
- For adherence, use a primer.
- To create a bead, wet the acrylic brush with monomer liquid and then dip it into the powder.
- From the cuticle region to the free edge, gently push the bead.
- Before sculpting, let it air dry.
- Apply base gel and let it cure for 60 seconds under an LED or UV lamp.
- After applying nail polish, let it cure for 60 seconds under an LED or UV lamp.
- Any nail art, including 2D, 3D, freehand, cat-eye, and more, can then be applied.
How to Maintain Your Nail Extensions?
- Avoid prolonged contact with water
- Wear gloves while doing household cleaning and other chores
- Moisturize with cream and cuticle oil daily
- Don’t use nails to scrub, open cans, lids and such
- Ensure that you have touch-ups after every 2-3 weeks post application


Leave a Reply